
If you have been trying to keep track of your company's Ad Accounts in a spreadsheet, you will probably want to capture that information in the Brandle Presence Manager, Ad Accounts Manager (an optional module). You can do this via our spreadsheet import utility but first, you'll need to make sure your data is in a form that the system can interpret accurately.
Structure and Format
Your spreadsheet should look something like this:

Rules
The first row of the spreadsheet should be a row of headers defining what to expect in the column:
- Platform - The platform where the Ad Account resides. Note: Any platform referenced in this column needs to be defined under "Account > Ad Account Settings" before importing. A reference to an undefined platform will result in the row being rejected to avoid errors in the spreadsheet creating bad data in your inventory. [Required]
- UID - The unique identifier (or account number) of the Ad Account on the platform. [Required]
- Category - The inventory category into which the Ad Account should be placed. Note: Any category referenced in this column needs to be defined under "Account > Ad Account Settings" before importing. A reference to an undefined category will result in the row being rejected to avoid errors in the spreadsheet creating bad data in your inventory. [Required]
- Name - Any descriptive name you would like to assign to the Ad Account. [Required]
- Description - An optional block of text to describe this Ad Account or its purpose. This field is purely informational and not required.
- TAG: <Tag Category> - The tags from <Tag Category> which are to be applied to this Ad Account. Each Tag Category (e.g. Brand, Division, Region, Country, etc.) must be in a different column. Multiple tags in a cell must be separated by semi-colons (;). Any references to an undefined Tag Category will result in the sheet being rejected. Any references to Tags that are not already defined will not stop the import of the Ad Account but the row will be returned to you indicating there were references to undefined Tags. This is to avoid errors in your spreadsheet creating bad Tag data in your account.
- CONTACT: <Contract Role> - The contacts to be applied to this Ad Account with <Contact Role>. Each Contact Role must be in a different column. Contacts are defined by their email addresses, which are unique. Multiple contacts in a cell must be separated by semi-colons (;). Any references to an undefined Contact Role will result in the sheet being rejected. Any references to Contacts that are not already defined will not stop the import of the Ad Account but the row will be returned to you indicating there were references to undefined Contacts. This is to avoid errors in your spreadsheet creating bad Contact data in your account.
- Notes - Any text you want to add to the Ad Account as a note.
To import a spreadsheet, choose the "Import Ad Accounts" option from the "Tools" menu. In the window that comes up, you can download an Excel document to use as a template.
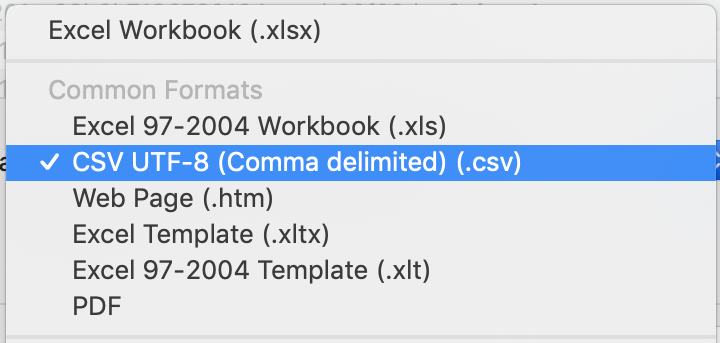
Once you have your spreadsheet in the proper format, you'll need to export or save it to a comma-separated values (CSV) format. Note that if your file contains international characters (e.g ñ, ü, ç, etc.), be sure to choose the export file type "CSV UTF-8 (Comma delimited) (.csv)" - see image below. If you have an older version of Excel or use a different spreadsheet application, you might have to choose a different option, which might be tab-delimited, but it should be in UTF-8 format.
Process
Here is the process the import will follow once you select your file and choose "Import":
- Your file will be sent to the server and the headers analyzed.
- The system will confirm that the required columns (Platform, Category, UID, and Name) are present. If any are missing, the whole spreadsheet will be rejected.
- Next, it will evaluate the Tag Categories and Contact Roles identified in the headers. If an unknown Tag Category or Contact Role is found, the whole spreadsheet will be rejected.
- If no errors are found in the header row, the server will begin processing each Ad Account row.
- If any row is missing a value for a required column (Platform, Category, UID, and Name), the row will be rejected and copied to a new CSV file that will be returned to you at the end of the import process.
- If any row references an undefined Platform or Category, the row will be rejected and copied to a new CSV file that will be returned to you at the end of the import process.
- Any row that is not immediately rejected will be sent to a background server for processing and the Ad Account should be created.
- If the Ad Account could not be created or a Tag or Contact could not be applied the row will be copied to a new CSV file to be returned to you at the end of the import process. Note, that even a Tag or Contact cannot be applied, the Ad Account still will be created, if possible.
- Once all of the rows have been processed by the background servers, the system will send you an email informing you of the results. If any row was rejected or an Ad Account could not be created or any Tag or Contact could not be applied, the email will contain a CSV file containing just the rows that had issues.
The Ad Account import process is generally additive, meaning you may import any particular row multiple times to add additional information to an Ad Account. The platform and UID are the key identifiers for an Ad Account. The Name and Category provided in the last import (or last row processed if an Ad Account is listed more than once in your spreadsheet – it happens!) are the values that will persist. Tags and Contacts will only be added to an Ad Account; if an Ad Account already has a Tag or Contact not listed in the row being imported it will not be removed. If the same Note is imported more than once, the note will be applied multiple times.
Note: Since the rows are handed off to multiple background servers for processing, there is no guarantee that the rows will be processed in the order they are listed in the file. If an Ad Account is listed more than once it may not be the last instance in the file that defines the final Category and Name of the Ad Account.
If the import process returned a CSV file back to you, each row will have three additional columns added to it titled: Rejected Tags, Rejected Contacts, Other Errors. Use the values in these columns to edit the other values in the row and resubmit. Note, we return the Notes column back to you, so you may want to delete this column before resubmitting unless you want the note to be applied a second time.
See Also
Comments
0 comments
Please sign in to leave a comment.