
Once you have populated the Campaign it's time to send it.
- Go to the Campaigns area of the Forms Tab. Select the gear icon of your populated Campaign and select Send Campaign. A dialog box will pop up for your to confirm OK.

- The contacts will receive the saved Campaign email (just like the above test email if there were no changes made).
- When the contact selects the Form button on the email, they will be taken to the From, which is pre-populated with their name and email. YOUR LOGO will be on this form.

- Janet submitted her personal Twitter account, which she uses for Brandle advocacy as well as personal tweets. In the screen below, the Status View shows that she submitted this POP and a star icon was placed next to the POP.

- Looking at the Tags and Contacts view (or a custom view), you can see the new entries.
- If the POP is not currently in your Inventory, you can place it in the correct Inventory Category after your review.

- If the POP is already in your Inventory, the star icon will let you know when you hover on it. If this is the case, just click on the arrow beside Submission and choose to Accept changes or Discard Changes after your review.
Resending Campaigns
It is often the case that Campaigns are used to to collect web presence information from a large community. It is not very common that everyone responds immediately to the first request, so Brandle has an easy way to resend the campaign to people who have not yet responded.
- From the Campaigns Tab, select Send Reminders.

- A modal will display where you can add a new email message that will PREFACE the existing Campaign message. Select a message that matches the urgency of your Campaign needs.


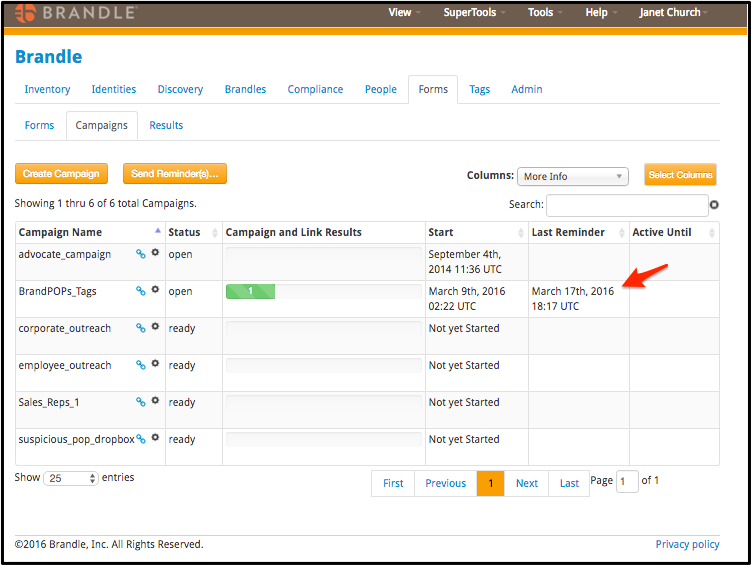
- When you take a look at Campaigns area with the More Info Columns View, you will see the date stamp of the last time you sent a campaign reminder in the Last Reminder Column.
Comments
0 comments
Please sign in to leave a comment.